
Water knowledge
Install a Water-Saving Drip Irrigation System: Step-by-Step Guide
Sep
Install a Water-Saving Drip Irrigation System: Step-by-Step Guide. In today’s article, diennuocmaiphuong.io.vn will explore with you in the most detailed and complete way. See now!
How to Install a Drip Irrigation System (Step-by-Step Guide)
Installing a drip irrigation system might seem daunting, but with the right guidance, it’s a DIY project that can be both rewarding and budget-friendly. Let’s break down the process step by step, ensuring you understand the essentials and feel confident throughout the journey.
Planning and Preparation
Before you dive into the installation, let’s lay the groundwork. This phase is crucial for setting yourself up for success.
Assess Your Needs
- Define your irrigation area: Start by identifying the specific areas of your garden you wish to irrigate. This might include vegetable patches, flowerbeds, individual trees, or even a small lawn.
- Determine plant water requirements: Research the specific water needs of the plants in each area. Some plants, like succulents, require minimal water, while others, like tomatoes, crave consistent moisture. Knowing your plants’ needs will help you choose the right components for your system.
- Evaluate existing water sources: Do you have a garden tap readily available? Is a well an option? Perhaps you can collect rainwater and utilize a rain barrel? Understanding your water source and its pressure will guide your system’s design.
Choosing the Right System
The drip irrigation system world offers a range of options, so let’s break down the popular choices and help you make the best selection.
- Types of drip systems: The most common types are micro-spray systems, drip tape systems, and drip emitter systems.
- Micro-spray systems use small, adjustable nozzles to distribute water in a fine mist.
- Drip tape systems are thin, porous tubes that deliver water directly to the soil, ideal for row gardens or beds.
- Drip emitter systems consist of tubing with individual emitters that release water at a controlled rate.
- Factors to consider: Beyond the types, consider the following factors when choosing a system:
- Budget: Drip systems range in price, from simple DIY kits to more complex, automated options.
- System complexity: Some systems require basic tools and minimal setup, while others may necessitate more technical skills.
- Plant types: The type of plants you’re watering will influence the emitter selection and spacing.
- Water pressure: Ensure your water source provides sufficient pressure for the chosen system to function optimally.
Gathering Materials
Now that you’ve chosen your system, let’s compile the necessary materials.
- Water source connection: This connects your system to your water source (tap, well, or rain barrel).
- Filter: This essential component removes debris from your water, preventing clogging of your tubing and emitters.
- Pressure regulator: This component controls the water pressure within your system, ensuring optimal flow and preventing damage to fragile plants.
- Tubing: This transports water throughout your irrigation area.
- Emitters: These release water directly to your plants, either as a gentle spray or a controlled drip.
- Stakes: These secure tubing and emitters in place, ensuring proper alignment and water delivery.
- Tools: You’ll need basic gardening tools, such as a shovel, a tape measure, a pair of scissors, and a wrench.
Design and Layout
Before you begin installation, it’s essential to have a clear visual plan for your system.
- Create a visual plan: Start by carefully measuring the area you’re irrigating. Map out the placement of plants and sketch the tubing runs.
- Consider flow rate and spacing: Research the water requirements of your plants and determine the flow rate and spacing for your emitters accordingly. For example, water-loving plants might require higher flow rates and more emitters, while drought-tolerant plants may require lower flow rates and wider emitter spacing.
Installation Process
Now comes the fun part – the actual installation! Remember to work carefully and methodically.
Connecting to Water Source
- Install a water source connection: This is your starting point. Connect your water source to a faucet, well, or rain barrel using an appropriate adapter.
- Connect the filter and pressure regulator: Install these components between the water source and your system.
- Safety precautions: Always turn off the water supply before working on the system. Use appropriate plumbing tools and ensure all connections are secure to prevent leaks.
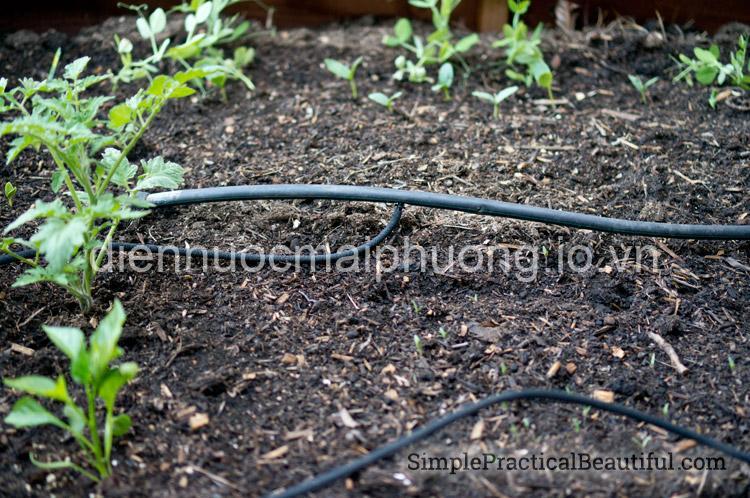
Laying the Tubing
The tubing carries water from the source to your plants.
- Tubing types: Select the appropriate tubing type based on your system’s requirements. Common options include:
- Poly tubing: Lightweight, flexible, and affordable.
- PVC tubing: Durable and resistant to UV damage.
- Connecting tubing: Use appropriate fittings and adaptors to connect tubing segments, ensuring a tight and leak-proof connection.
- Burying or surface-mounting: Decide whether to bury your tubing beneath the soil or surface-mount it along the ground. Burying can protect tubing from weather damage, while surface-mounting offers easier access for maintenance.
Installing Emitters
Emitters deliver water directly to your plants.
- Emitter types: Choose emitters based on your plant needs and the type of system you’ve selected.
- Micro-spray emitters: Ideal for general watering of large areas or for specific plants that require a fine mist.
- Drip emitters: Deliver water directly to the root zone, reducing water loss through evaporation.
- Drip tape: A simple and effective option for row gardens or beds.
- Installing emitters: Secure emitters to the tubing using appropriate clamps or connectors. Space emitters according to your plant needs and the recommended spacing for your chosen emitter type.
Testing and Adjusting
Once your system is installed, it’s time to test its functionality and make necessary adjustments.
- Turn on the system: Carefully open your water source and check for leaks or malfunctions.
- Adjust water pressure: If needed, use the pressure regulator to adjust the water pressure within the system.
- Adjust emitter flow rate: Ensure all emitters are delivering water at an appropriate rate. You can adjust the flow rate of individual emitters by adjusting the needle or the pin on the emitter.
- Troubleshooting: If you encounter any issues, such as leaks, low water pressure, or clogged emitters, refer to your system’s manual or consult with a professional for assistance.
Maintenance and Tips
To keep your drip irrigation system running smoothly and efficiently, follow these maintenance tips.
Regular Maintenance
- Clean filters: Clean your filter regularly, at least once a month or more often if your water source is particularly dirty.
- Inspect tubing and emitters: Check for wear and tear, leaks, or clogs.
- Winterize: If you live in a climate with freezing winters, drain your system to prevent water from freezing and damaging the components.
Tips for Efficient Use
- Water deeply and infrequently: Allow the soil to dry slightly between waterings, encouraging deeper root growth.
- Monitor plant growth: Adjust your watering schedule as your plants grow and their water needs change.
- Use mulch: Apply a layer of mulch around your plants to help retain moisture and suppress weed growth.
Choosing the Right Drip Irrigation System
Now that you’ve learned about the basics of installing a drip irrigation system, let’s delve deeper into choosing the right system for your specific needs.
Different Types of Drip Systems
- Micro-spray systems: Suitable for areas that require more widespread coverage, such as lawns or large flowerbeds.
- Drip tape systems: Best for row gardens or beds where consistent moisture is needed.
- Drip emitter systems: Offer precise water delivery to specific plants, ideal for individual plants or areas with varying water requirements.
Factors to Consider
- Budget: Establish your budget before making a purchase to guide your selection.
- Plant needs: Consider the water requirements of your plants when choosing emitters and flow rates.
- Water pressure: Ensure your water source provides adequate pressure for the system to function correctly.
- System complexity: Choose a system that matches your DIY comfort level.
- Installation difficulty: Factor in the complexity of the installation and the tools you have available.
Recommendations based on different gardening scenarios:
- Small vegetable gardens: A drip tape or drip emitter system is often a good choice.
- Large flowerbeds: Micro-spray or drip emitter systems can efficiently water a wide area.
- Lawns: A micro-spray system can effectively irrigate a lawn while conserving water.
- Trees and shrubs: Drip emitter systems are ideal for providing targeted water directly to the root zone.
Troubleshooting Common Issues
Despite careful planning and installation, sometimes issues can arise. Let’s look at common problems and how to address them.
Low Water Pressure
- Causes: Obstructed water source, clogged filter, faulty pressure regulator.
- Solutions: Check your water source for obstructions, clean your filter, or replace the pressure regulator if necessary.
Clogged Emitters
- Causes: Build-up of debris, mineral deposits.
- Solutions: Use a small wire or pin to clean out the emitters, or try soaking them in a vinegar solution to remove mineral deposits.
Leaks in the System
- Locating leaks: Check all connections, fittings, and tubing for leaks.
- Repairing leaks: Tighten loose connections, replace damaged fittings, or patch leaks in tubing using specialized tape or sealant.
Uneven Water Distribution
- Identifying areas with uneven water flow: Observe the water flow from each emitter and look for areas where the water isn’t reaching the plant roots.
- Adjusting emitters and flow rates: Adjust the flow rate of individual emitters to ensure even water distribution throughout your system.
Benefits of Drip Irrigation
Beyond the installation process, drip irrigation systems offer significant benefits for your garden, the environment, and your time.
Water Conservation
- Explain how drip irrigation saves water compared to traditional methods: Drip irrigation targets water directly to the root zone, minimizing evaporation and runoff. Traditional sprinkler systems, on the other hand, can lose a significant amount of water through evaporation and wind drift.
- Provide statistics and examples of water savings: Studies show that drip irrigation can save up to 50% of water compared to traditional watering methods.
Improved Plant Health
- Describe how drip irrigation promotes healthy plant growth: Drip irrigation provides consistent moisture to the roots, promoting stronger and healthier plant growth.
- Explain how targeted watering benefits roots and reduces disease: Targeted watering helps prevent overwatering and root rot, reducing the risk of fungal diseases.
Reduced Labor
- Discuss the time and effort saved with a drip irrigation system: With a drip irrigation system, you can forget about the time-consuming task of hauling hoses and watering your garden by hand.
- Compare it to the effort required for traditional watering methods: Traditional watering methods often involve more manual labor and require you to be present to monitor the watering process.
Environmental Benefits
- Explain how drip irrigation contributes to sustainability: By reducing water use, drip irrigation helps conserve water resources and promotes sustainable gardening practices.
- Discuss the impact on water resources and ecosystems: Reducing water consumption and runoff helps protect water resources and the surrounding ecosystems.
Conclusion
Installing a drip irrigation system is a rewarding project that benefits your garden, the environment, and your time. I encourage you to learn more and take the plunge into this innovative watering technique! Visit my website, diennuocmaiphuong.io.vn, to browse our selection of high-quality drip irrigation products and find resources to further your knowledge. Don’t hesitate to leave comments or share your experiences below!
FAQs
How often should I clean the filter in my drip irrigation system?
The frequency of filter cleaning depends on the water source and the amount of debris it contains. Generally, it’s recommended to clean the filter at least once a month, but more frequent cleaning may be necessary if you have a particularly dirty water source or a lot of plant debris in your system.
What happens if the water pressure is too low for my drip irrigation system?
Low water pressure can significantly affect the performance of your system. The emitters might not deliver enough water to your plants, and the water flow might be uneven. If you have low water pressure, check the water source for obstructions, make sure the filter is clean, and adjust the pressure regulator if needed.
Can I install a drip irrigation system myself, or do I need to hire a professional?
While some systems are more complex than others, most DIY drip irrigation systems can be installed by a homeowner with basic plumbing and gardening skills. However, if you’re not comfortable with DIY projects or have a particularly large or complex system, consider hiring a professional for assistance.
How long will my drip irrigation system last?
The lifespan of a drip irrigation system depends on the quality of the materials, the maintenance schedule, and the environmental conditions. With proper care, a drip irrigation system can last for many years, providing consistent watering for your garden.
What are the advantages of using drip irrigation over traditional sprinkler systems?
Drip irrigation offers several advantages over sprinkler systems, including:
- Water Conservation: Drip irrigation directly targets the root zone, minimizing water loss through evaporation and runoff, leading to significant water savings.
- Improved Plant Health: Targeted water delivery promotes healthier plant growth and reduces the risk of diseases caused by overwatering.
- Reduced Labor: Drip irrigation requires less maintenance and manual labor compared to sprinkler systems.
- Environmental Sustainability: Conserving water helps protect valuable resources and contributes to more sustainable gardening practices.
ERE
- Drip Irrigation System | Installed in | Garden
- Drip Irrigation System | Requires | Water Source, Filter, Pressure Regulator
- Garden | Contains | Plants
- Plants | Benefit from | Drip Irrigation
- Emitters | Deliver | Water to Plants
- Tubing | Connects | Water Source, Emitters
- Water Source | Provides | Water to Drip System
- Filter | Removes | Debris from Water
- Pressure Regulator | Controls | Water Pressure
- Installation | Requires | Tools, Materials, Knowledge
- Maintenance | Includes | Cleaning, Inspection, Repairs
- Water Conservation | Achieved through | Efficient Watering
- Gardening | Requires | Knowledge, Skills, Resources
- Landscape Design | Utilizes | Drip Irrigation Systems
- Water Management | Aims to | Conserve Water
- Sustainable Practices | Include | Water Conservation
- DIY Project | Can be | Installed by homeowner
- Home Improvement | Enhances | Property value
- Plant Care | Requires | Proper Watering, Nutrition
- Soil | Provides | Nutrients to plants
EAV
- Drip Irrigation System | Type | Micro-spray, Drip Tape, Drip Emitters
- Drip Irrigation System | Material | Plastic, PVC, Metal
- Emitters | Flow Rate | 0.5 GPH, 1 GPH, 2 GPH
- Tubing | Diameter | 1/4 inch, 1/2 inch, 3/4 inch
- Filter | Type | Screen Filter, Disk Filter
- Pressure Regulator | PSI | 10 PSI, 20 PSI, 30 PSI
- Plant | Water Needs | High, Medium, Low
- Garden | Size | Small, Medium, Large
- Lawn | Area | 100 sq ft, 500 sq ft, 1000 sq ft
- Water Source | Type | Tap, Well, Rain Barrel
- Installation | Cost | $50, $100, $200
- Installation | Time | 1 Hour, 2 Hours, 3 Hours
- Water Conservation | Percentage | 50%, 75%, 90%
- Watering Schedule | Frequency | Daily, Weekly, Monthly
- Soil | Type | Clay, Sandy, Loamy
- Plant | Type | Vegetables, Flowers, Trees
- Drip System | Brand | Rain Bird, Toro, Orbit
- Drip System | Warranty | 1 Year, 2 Years, 5 Years
- Installation | Difficulty | Easy, Medium, Hard
- Maintenance | Frequency | Monthly, Quarterly, Annually
Semantic Triples
- (Drip Irrigation System, is a, Water-Saving Technique)
- (Garden, is watered by, Drip Irrigation System)
- (Emitters, deliver, Water to Plant Roots)
- (Tubing, connects, Water Source to Emitters)
- (Filter, removes, Debris from Water)
- (Pressure Regulator, controls, Water Pressure)
- (Installation, requires, Tools and Materials)
- (Maintenance, includes, Cleaning and Inspection)
- (Water Conservation, achieved through, Efficient Watering)
- (Gardening, requires, Knowledge and Skills)
- (Landscape Design, utilizes, Drip Irrigation Systems)
- (Water Management, aims to, Conserve Water)
- (Sustainable Practices, include, Water Conservation)
- (DIY Project, can be, Installed by homeowner)
- (Home Improvement, enhances, Property value)
- (Plant Care, requires, Proper Watering and Nutrition)
- (Soil, provides, Nutrients to plants)
- (Drip Irrigation System, is used for, Water Conservation)
- (Emitters, are designed for, Targeted Watering)
- (Tubing, is a key component of, Drip Irrigation Systems)