
Water knowledge
How to Fix a Leaky Shower: Find & Fix the Leak Source – diennuocmaiphuong.io.vn
Sep
How to Fix a Leaky Shower: Find & Fix the Leak Source – diennuocmaiphuong.io.vn. In today’s article, diennuocmaiphuong.io.vn will explore with you in the most detailed and complete way. See now!
Identifying the Source of the Leak
The first step to repairing a leaky shower is to determine where the leak is coming from. This might seem obvious, but sometimes leaks can be tricky to find. There are two main ways to identify the leak:
Visual Inspection:
- Start by looking closely at the showerhead, shower arm, and shower valve for any signs of leaks. Check for drips, drips, or cracks in the metal.
- Look around the shower base and walls for signs of water damage. This could include discoloration, peeling paint, or even mold growth.
- Examine the shower tiles for any cracks or loose grout. Cracked tiles can often lead to leaks under the surface.
Water Testing:
- Turn off the water supply to the shower. This is usually done by shutting off the valve to the shower, which is often located behind a wall access panel.
- Run the shower for a short period and observe the leak location. You can even use a flashlight to get a better view.
- If the leak is coming from the showerhead or shower arm, turn the water supply back on and observe the water flow. This will help to isolate the leak source.
Common Leak Scenarios and Solutions
Once you know where the leak is coming from, you can start to repair it. Here are some common leak scenarios and their solutions:
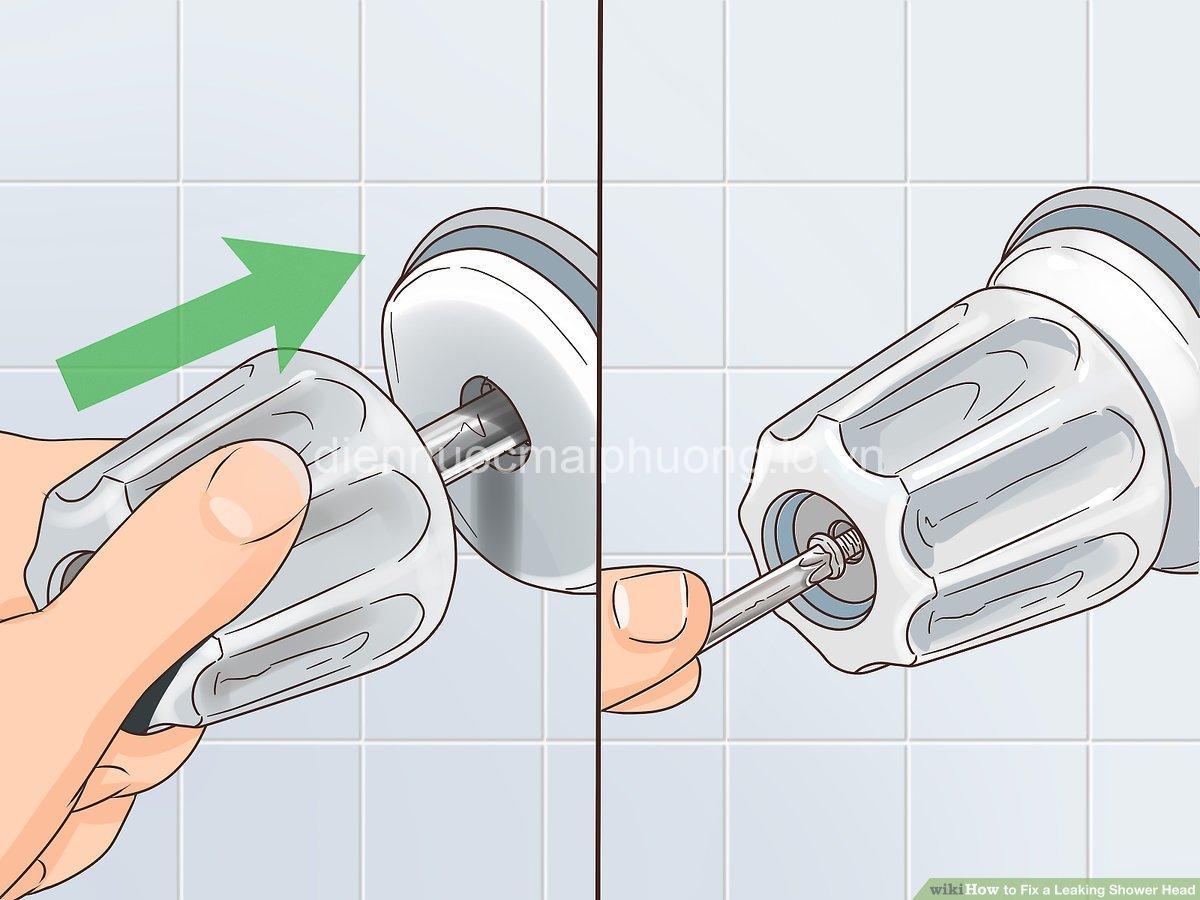
Leaky Showerhead:
- Causes: A worn-out O-ring is a common culprit. Mineral buildup or a loose connection can also cause leaks.
- Solutions: You can try cleaning or replacing the O-ring. If the showerhead is heavily mineralized, you might need to descale it. A loose showerhead can be tightened with a wrench.
Leaky Shower Arm:
- Causes: Leaky shower arms often occur due to loose connections or worn-out O-rings. Occasionally, a cracked shower arm can also be the problem.
- Solutions: If the connection is loose, tighten it with a wrench. You might need to replace the O-ring. If the arm is cracked, you’ll need to replace it.
Leaky Shower Valve:
- Causes: Worn-out valve stems, loose cartridges, or leaking valve seats are common culprits.
- Solutions: Replacing the valve stem, cartridge, or valve seat can resolve the leak.
Leaky Shower Base or Floor:
- Causes: Cracked tiles, loose grout, or a broken drain pipe are the most common culprits.
- Solutions: Repair or replace the cracked tiles. If grout is loose, you’ll need to re-grout the shower base. If the drain pipe is broken, you’ll need to fix it.
Tools and Materials
You’ll need a few basic tools and materials to repair a leaky shower:
- Adjustable wrench
- Screwdriver
- Pliers
- O-rings
- Showerhead (if replacing)
- Shower arm (if replacing)
- Shower valve cartridge (if replacing)
- Grout (if re-grouting)
- Silicone sealant (for sealing cracks)
- Caulking gun (to apply sealant)
Step-by-Step Repair Instructions
Here are step-by-step instructions for repairing a leaky shower:
Leaky Showerhead:
- Turn off the water supply to the shower.
- Disconnect the showerhead from the shower arm. Use a wrench to loosen the showerhead if it’s stuck.
- Clean or replace the O-ring. If the O-ring is worn, replace it with a new one.
- If the showerhead is mineralized, use a descaler to clean it. Follow the descaler instructions carefully.
- Tighten the showerhead back onto the shower arm.
- Turn the water supply back on and check for leaks.
Leaky Shower Arm:
- Turn off the water supply to the shower.
- Disconnect the shower arm from the shower valve.
- Tighten the connections.
- If the O-ring is worn, replace it with a new one.
- If the shower arm is cracked, you will need to replace it.
- Reconnect the shower arm to the shower valve.
- Turn the water supply back on and check for leaks.
Leaky Shower Valve:
- Turn off the water supply to the shower.
- Remove the shower trim to access the shower valve.
- Replace the valve stem, cartridge, or valve seat. Refer to the manufacturer’s instructions for specific procedures.
- Reassemble the shower trim.
- Turn the water supply back on and check for leaks.
Leaky Shower Base or Floor:
- Identify the leak source.
- Repair or replace cracked tiles.
- Re-grout loose grout areas.
- Fix any broken drain pipes.
- Seal the shower base and walls with silicone sealant.
Safety Precautions
- Always turn off the water supply to the shower before starting any repairs.
- Wear safety goggles to protect your eyes from debris.
- Use gloves to protect your hands from chemicals and sharp edges.
- Exercise caution when working with tools.
When to Call a Professional
While many shower repairs can be done by a homeowner, there are times when it’s best to call a professional plumber:
- Complex plumbing issues: If the leak is difficult to access or if you’re unsure about the repair, it’s best to call a plumber.
- Extensive damage: If there is significant water damage, a plumber can assess the situation and recommend appropriate repairs.
Preventive Maintenance
- Clean showerheads regularly: Mineral buildup can cause leaks, so it’s important to clean your showerhead regularly. You can use a descaler or a vinegar solution.
- Inspect O-rings: Inspect O-rings for signs of wear and replace them as needed.
- Check for loose connections: Make sure all connections are tight, including the showerhead, shower arm, and valve.
- Inspect grout: Inspect grout for cracks or looseness. If there are any, re-grout the shower base.
Frequently Asked Questions
What causes a shower to leak?
Several things can cause a shower to leak, including worn-out O-rings, loose connections, mineral buildup, cracked shower arms, and leaking shower valves.
How do I know if my shower head is leaking?
If you see water dripping from the showerhead when it’s not in use, or if the water flow is weak or inconsistent, your showerhead might be leaking.
How do I fix a leaky shower valve?
You’ll need to replace the valve stem, cartridge, or valve seat. Refer to the manufacturer’s instructions for specific procedures.
How do I repair a leaky shower base?
You’ll need to repair or replace cracked tiles, re-grout loose grout, and seal the shower base with silicone sealant.
Conclusion
Learning how to repair a leaky shower can save you time, money, and hassle. By following these steps and tips, you can easily fix common leaks and prevent future problems.
Jessica David Rodriguez, an expert in electrical and plumbing, encourages you to share your experiences, ask questions, and explore more information on her website: diennuocmaiphuong.io.vn.
EAVs
- Showerhead | Type | Handheld
- Showerhead | Material | Brass
- Shower Valve | Brand | Delta
- Shower Arm | Length | 12 inches
- Shower Base | Material | Ceramic Tile
- Shower Grout | Color | White
- Leak | Location | Showerhead
- Leak | Cause | Worn O-ring
- Repair | Method | Replace O-ring
- Tool | Type | Adjustable Wrench
- Part | Type | Showerhead O-ring
- Cost | Repair | $20
- Water Damage | Severity | Minor
- Diagnosis | Method | Visual Inspection
- Prevention | Method | Regular Maintenance
- Shower | Installation | DIY
- Shower | Age | 10 Years
- Water | Pressure | 60 PSI
- Repair | Duration | 1 Hour
- Cost | Professional | $150
ERE
- Showerhead – IS_A – Part
- Shower Valve – CONNECTED_TO – Shower Arm
- Shower Arm – ATTACHES_TO – Showerhead
- Shower Base – MADE_OF – Tile
- Shower Grout – SEALS – Shower Base
- Leak – CAUSES – Water Damage
- Repair – INVOLVES – Tools
- Repair – USES – Parts
- Repair – HAS_COST – Dollar Amount
- Diagnosis – USES – Visual Inspection
- Prevention – INVOLVES – Maintenance
- Shower – ISINSTALLEDBY – Plumber
- Shower – ISUSEDFOR – Bathing
- Showerhead – ISMADEOF – Metal
- Shower Valve – HAS_BRAND – Delta
- Shower Arm – HAS_LENGTH – 12 inches
- Leak – ISLOCATEDAT – Showerhead
- Leak – ISCAUSEDBY – Worn O-ring
- Repair – ISDONEBY – DIYer
- Water – HAS_PRESSURE – 60 PSI
Semantic Triple
- (Showerhead, IS_A, Part)
- (Shower Valve, CONNECTED_TO, Shower Arm)
- (Shower Arm, ATTACHES_TO, Showerhead)
- (Shower Base, MADE_OF, Tile)
- (Shower Grout, SEALS, Shower Base)
- (Leak, CAUSES, Water Damage)
- (Repair, INVOLVES, Tools)
- (Repair, USES, Parts)
- (Repair, HAS_COST, Dollar Amount)
- (Diagnosis, USES, Visual Inspection)
- (Prevention, INVOLVES, Maintenance)
- (Shower, ISINSTALLEDBY, Plumber)
- (Shower, ISUSEDFOR, Bathing)
- (Showerhead, ISMADEOF, Metal)
- (Shower Valve, HAS_BRAND, Delta)
- (Shower Arm, HAS_LENGTH, 12 inches)
- (Leak, ISLOCATEDAT, Showerhead)
- (Leak, ISCAUSEDBY, Worn O-ring)
- (Repair, ISDONEBY, DIYer)
- (Water, HAS_PRESSURE, 60 PSI)