
Electrical Knowledge
How to Install a Ceiling Fan: Step-by-Step Guide & Tips
Sep
How to Install a Ceiling Fan: Step-by-Step Guide & Tips. In today’s article, diennuocmaiphuong.io.vn will explore with you in the most detailed and complete way. See now!
Step-by-Step Guide to Installing a Ceiling Fan
You’re ready to take on the challenge of installing a ceiling fan yourself. It’s a great way to add style and functionality to any room, and it’s a project that you can feel proud of accomplishing! To make the process smooth and successful, let’s gather the essential tools and materials.
Gathering the Right Tools and Materials
First, let’s equip ourselves with the right tools:
- Ladder: A stable ladder that reaches the ceiling safely.
- Screwdriver: Both a Phillips head and flathead screwdriver.
- Wire Strippers: For stripping insulation off the electrical wires.
- Level: To ensure the bracket and fan are properly aligned.
- Drill: For drilling pilot holes if needed.
- Tape Measure: To measure distances and ensure proper sizing.
- Stud Finder: To locate the ceiling joists for secure mounting.
- Wire Connectors: For connecting electrical wires safely.
- Electrical Tape: To secure wire connections and prevent shorts.
- Safety Glasses: To protect your eyes during installation.
- Gloves: To protect your hands from cuts and electrical shocks.
Now, let’s gather the necessary materials:
- Mounting Bracket: A secure bracket to support the fan.
- Ceiling Fan: Choose one that suits your room size, style, and desired airflow.
- Fan Blades: Make sure the blades are compatible with your chosen fan.
- Light Kit: (Optional) If you want a fan with a built-in light.
- Remote Control: (Optional) For convenient control of the fan.
- Electrical Box: Ensuring the electrical box is properly wired for the fan.
Safety First: Precautions for a Safe Installation
Safety is paramount when working with electricity. Here are some crucial steps:
- Disconnect the Power Supply: Before you begin, always switch off the power to the circuit at the breaker box.
- Use a Stable Ladder: Make sure your ladder is securely positioned on a level surface.
- Wear Protective Gear: Wear safety glasses and gloves to protect yourself from potential hazards.
- Follow Electrical Safety Guidelines: Adhere to all electrical safety codes and regulations.
Mounting the Bracket
Let’s secure the foundation for your ceiling fan.
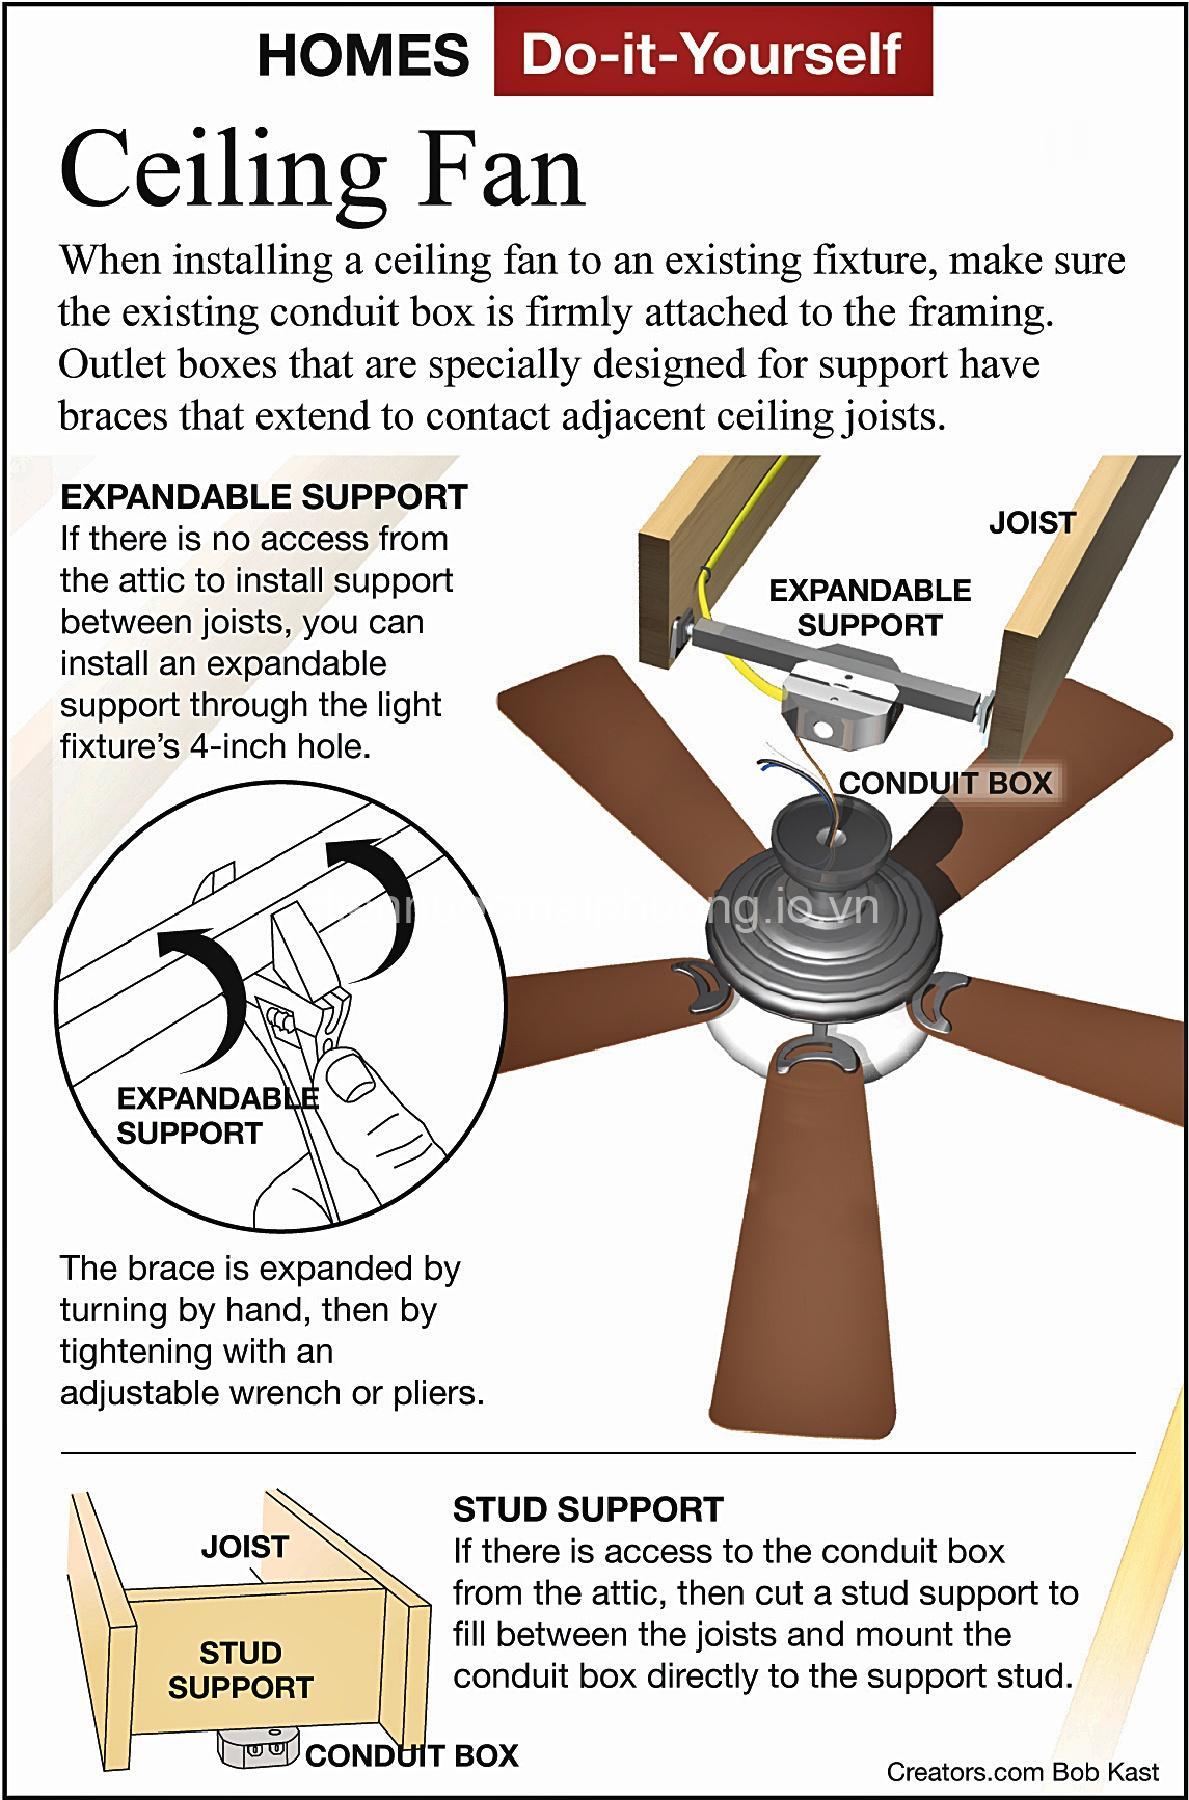
- Locate the Ceiling Joist: Use a stud finder to identify the joist in your ceiling.
- Attach the Mounting Bracket: Securely attach the bracket to the ceiling joist using appropriate screws.
- Ensure Level: Use a level to make sure the bracket is perfectly level before tightening the screws completely.
Connecting the Electrical Wires
Next, we’ll connect the wires safely.
- Identify the Wires: Locate the black (hot), white (neutral), and ground (usually green or bare copper) wires on both the ceiling fan and the electrical box.
- Connect the Wires: Connect the corresponding wires from the fan to the electrical box using wire connectors.
- Secure the Connections: Securely wrap the wire connectors with electrical tape to prevent loose connections.
Attaching the Fan
Now, it’s time to attach the fan to the bracket.
- Lift the Fan: Carefully lift the fan onto the mounting bracket.
- Secure the Fan: Securely attach the fan to the bracket using the provided screws.
- Ensure Level: Double-check that the fan is level before tightening the screws fully.
Installing the Blades
Let’s add the blades to your fan.
- Attach the Blades: Attach the fan blades to the blade holder according to the manufacturer’s instructions.
- Tighten the Screws: Securely tighten the screws to ensure the blades are balanced.
- Check for Wobble: Spin the blades to check for any wobble or instability.
Installing the Light Kit (if applicable)
If you have a ceiling fan with a light kit:
- Follow Manufacturer’s Instructions: Refer to the specific instructions provided for your fan model.
- Connect Wiring: Connect the light kit wiring to the fan wiring.
Installing the Remote Control (if applicable)
If your fan comes with a remote control:
- Pair the Remote: Pair the remote control to the fan according to the instructions.
- Test Functions: Test the remote control to ensure all functions are working properly.
Testing and Troubleshooting
After completing the installation:
- Turn On Power: Switch the power back on at the breaker box.
- Check Operation: Test the fan by turning it on and checking all speed settings, light settings, and remote control functionalities.
- Ensure Smooth Operation: Make sure the fan rotates smoothly and silently without any vibrations or noises.
Choosing the Right Ceiling Fan for Your Needs
Before embarking on your installation journey, let’s choose a fan that’s perfect for your space and needs!
Factors to Consider:
- Room Size: A larger fan is needed for larger rooms to effectively circulate air.
- Ceiling Height: If you have high ceilings, a fan with a longer downrod may be necessary.
- Style Preferences: Choose a fan that complements the overall decor and style of your room.
- Desired Airflow: Consider how much air circulation you need and choose a fan with the appropriate blade size and motor.
- Budget: Ceiling fans come in a range of prices, so set a budget and look for a fan that fits your budget.
Types of Fans Available:
- Standard: These fans typically have 3-4 speeds and are ideal for basic air circulation.
- Flush Mount: These fans are designed for low ceilings and have a compact design.
- Light-Equipped: These fans include a built-in light fixture, offering both illumination and air circulation.
- Smart: These fans are equipped with features like smartphone control, timers, and even voice activation.
Tips for Choosing the Right Size and Style:
- Fan Size Calculation: To calculate the right fan size for your room, multiply the room’s length and width. For example, a 10ft x 12ft room needs a fan with a 42-inch blade span.
- Style and Decor: Choose a fan that complements your room’s furniture, colors, and overall style.
Maintenance and Care for Your Ceiling Fan
Just like any appliance, your ceiling fan needs a little love and care.
Regular Cleaning
Dust and debris can accumulate on the blades and motor housing, affecting performance.
- Dust and Clean: Regularly dust and clean the fan blades and motor housing with a soft cloth and mild detergent.
- Avoid Harsh Cleaners: Don’t use harsh chemicals or abrasive cleaners that can damage the fan’s finish.
Lubrication
To ensure smooth operation, lubricate the fan motor bearings.
- Follow Manufacturer’s Instructions: Refer to your fan’s manual for specific lubrication recommendations and instructions.
Safety Checks
Performing regular safety checks helps prevent issues.
- Inspect for Wear and Damage: Check for any signs of wear, cracks, or damage to the blades, motor housing, or wiring.
- Tighten Screws: Ensure all screws are securely tightened.
- Replace Damaged Parts: If you notice any damage or wear, replace the affected parts promptly.
Troubleshooting Common Installation Issues
Despite following the installation guide, sometimes you might encounter issues.
Fan Doesn’t Turn On
- Check Connections: Double-check all wire connections to ensure they are secure and properly connected.
- Check Power Supply: Make sure the power supply is switched on at the breaker box.
- Check Fuse: Inspect the fuse box to ensure the fuse isn’t blown.
Fan Wobbles
- Check Screws: Ensure all screws are securely tightened.
- Balance Blades: If the blades are unbalanced, adjust the blade weight to balance them.
- Reinstall Fan: Make sure the fan is securely mounted and properly level.
Fan Makes Noise
- Check Blades: If the blades are loose, tighten the screws.
- Check Bearings: If the fan bearings are worn, they may need to be replaced.
- Remove Debris: Remove any debris from the motor housing that could be causing noise.
When to Seek Professional Help
If you’re not comfortable with any aspect of the installation or encounter persistent issues:
Lack of Expertise
- Electrical Wiring: If you’re unsure about electrical wiring or working with electricity, it’s best to consult a professional.
- Ladder Use: If you’re not comfortable working on a ladder, seeking professional help is advisable.
Complex Installations
- Smart Fans: Installing smart fans with advanced features may require professional expertise.
- Unique Wiring or Ceiling Structures: If your home has unique electrical wiring or a challenging ceiling structure, a professional can handle the installation safely.
Benefits of Installing a Ceiling Fan
Investing in a ceiling fan offers several advantages.
Energy Efficiency
- Reduce Energy Consumption: Ceiling fans consume less energy than air conditioners, helping you save on energy bills.
- Cool Your Home: Ceiling fans provide a cooling breeze, reducing your reliance on air conditioning.
Improved Comfort
- Summer Cooling: Ceiling fans create a gentle breeze to keep you comfortable during the summer.
- Winter Circulation: In winter, circulating the warm air with a ceiling fan can make your home feel more comfortable.
Aesthetic Appeal
- Visual Enhancement: Ceiling fans can elevate the look of any room.
- Style and Sophistication: They add a touch of elegance and style to your home.
Conclusion
Installing a ceiling fan is a rewarding project that you can accomplish with the right information and a little patience. Remember to always prioritize safety and consult a professional when in doubt.
Ready to learn more about electrical and water products? Check out our website, diennuocmaiphuong.io.vn, for a wide selection of quality products and insightful information. We’d love to hear your thoughts and experiences in the comments section below!
Jessica David Rodriguez, Owner of diennuocmaiphuong.io.vn
EREs:
* Ceiling Fan | is-a | Electrical Appliance
* Ceiling Fan | has | Blades
* Ceiling Fan | has | Motor
* Ceiling Fan | has | Light Kit (optional)
* Ceiling Fan | uses | Remote Control (optional)
* Installation | requires | Tools
* Installation | requires | Materials
* Installation | involves | Steps
* Troubleshooting | addresses | Issues
* Troubleshooting | provides | Solutions
* Maintenance | includes | Cleaning
* Maintenance | includes | Lubricating
* Maintenance | includes | Inspecting
* Safety | involves | Precautions
* Safety | involves | Rules
* Safety | involves | Warnings
* Room | has | Ceiling Height
* Room | has | Size
* Budget | influences | Ceiling Fan Price
Semantic Triples:
* (Ceiling Fan, is-a, Electrical Appliance)
* (Ceiling Fan, has, Blades)
* (Ceiling Fan, has, Motor)
* (Installation, requires, Tools)
* (Installation, involves, Steps)
* (Troubleshooting, addresses, Issues)
* (Troubleshooting, provides, Solutions)
* (Maintenance, includes, Cleaning)
* (Maintenance, includes, Lubricating)
* (Maintenance, includes, Inspecting)
* (Safety, involves, Precautions)
* (Safety, involves, Rules)
* (Safety, involves, Warnings)
* (Room, has, Ceiling Height)
* (Room, has, Size)
* (Budget, influences, Ceiling Fan Price)
* (Ceiling Fan, uses, Remote Control)
* (Ceiling Fan, has, Light Kit)
* (Installation, requires, Materials)
* (Ceiling Fan, is-a, Home Improvement Project)
EAVs:
* Ceiling Fan | Type | Standard, Flush Mount, Light-Equipped, Smart
* Ceiling Fan | Brand | Hunter, Casablanca, Hampton Bay, Fanimation, Minka Aire
* Ceiling Fan | Size | 36″, 42″, 52″, 60″
* Ceiling Fan | Motor Type | DC, AC
* Ceiling Fan | Speed Settings | 3, 4, 5, 6
* Ceiling Fan | Light Kit | Yes, No
* Ceiling Fan | Remote Control | Yes, No
* Ceiling Fan | Price | $50 – $500+
* Installation | Tools | Ladder, Screwdriver, Wire Strippers, Level, Drill, Tape Measure, Stud Finder
* Installation | Materials | Mounting Bracket, Ceiling Fan, Fan Blades, Light Kit (if applicable), Remote Control (if applicable), Electrical Box
* Installation | Steps | Mounting Bracket, Connecting Wires, Attaching Fan, Installing Blades, Installing Light Kit, Installing Remote Control
* Troubleshooting | Issue | Fan Not Turning On, Fan Wobbles, Fan Makes Noise
* Troubleshooting | Solution | Check Connections, Check Power Supply, Check Fuse, Tighten Screws, Balance Blades, Check Bearings, Remove Debris
* Maintenance | Activity | Cleaning, Lubricating, Inspecting
* Maintenance | Tools | Soft Cloth, Mild Detergent, Lubricant
* Maintenance | Frequency | Monthly, Quarterly, Annually
* Safety | Precautions | Disconnect Power, Use Ladder Safely, Wear Gloves and Eye Protection
* Safety | Rules | Follow Electrical Codes, Use Proper Tools, Don’t Work Alone
* Safety | Warnings | Never Work on Live Wires, Don’t Overtighten Screws, Be Aware of Ceiling Height
Semantic Keywords:
* Ceiling fan installation
* DIY ceiling fan installation
* Home improvement
* Electrical wiring
* Safety precautions
* Ceiling fan types
* Fan blade installation
* Mounting bracket
* Wire connectors
* Remote control installation
FAQ:
How do I choose the right ceiling fan for my room?
The best ceiling fan for your room depends on a few factors:
- Room Size: Choose a fan with a blade span that’s roughly 1/2 of the room’s width. For example, a 10ft x 12ft room needs a fan with a 42-inch blade span.
- Ceiling Height: For standard ceilings, a standard fan with a short downrod works well. If you have high ceilings, you’ll need a longer downrod.
- Style: Choose a fan style that complements your room’s decor and furniture.
What are the safety precautions I need to take when installing a ceiling fan?
Safety should be your top priority when installing a ceiling fan. Here are some essential precautions:
- Always disconnect power: Before working on the electrical wiring, always turn off the power at the breaker box.
- Use a stable ladder: Ensure your ladder is securely positioned on a level surface.
- Wear protective gear: Wear safety glasses and gloves to protect yourself from potential hazards.
- Follow electrical codes: Adhere to all electrical safety codes and regulations.
What should I do if my ceiling fan doesn’t turn on?
If your fan doesn’t turn on, there are a few troubleshooting steps to take:
- Check the connections: Make sure the electrical wires are securely connected using wire connectors and electrical tape.
- Check the power supply: Ensure the breaker is switched on.
- Check the fuse: Inspect the fuse box to see if the fuse has blown.
How do I maintain and care for my ceiling fan?
Here are some tips for maintaining your ceiling fan:
- Regular Cleaning: Dust and clean the fan blades and motor housing regularly with a soft cloth and mild detergent.
- Lubrication: Lubricate the motor bearings according to the manufacturer’s instructions.
- Safety Checks: Regularly inspect the fan for any signs of wear, damage, or loose screws. Replace any damaged parts promptly.
When should I call a professional electrician?
If you are not comfortable working with electricity or have any doubts about the installation process, it’s best to call a professional electrician.
- Complex installations: If you’re installing a smart fan or have unique electrical wiring or a challenging ceiling structure, a professional can handle the installation safely.
- Lack of experience: If you don’t feel confident in your electrical skills, a professional electrician can ensure a safe and proper installation.